
Configuring the Navigation Drawer Menu in Materia X2 Theme
Navigation Drawer Menu in the Materia X2 Theme is part of the main menu that can be arranged easily. Generally, the Navigation Drawer Menu consists of important links to navigate to specific pages on the Website.
If you don't set the Navigation Drawer Menu, the Navigation Drawer Menu Toggle Button in the Header will also not appear. Here, you can set it up with several steps that will be explained and can be done easily.
Table of Contents
Adding Menu Items to the Navigation Drawer Menu
You can add, remove or edit menu items in the Navigation Drawer Menu by following these steps:
- Go to Blogger Dashboard and select the Layout menu.
- Look for the section titled Navigation Drawer and More Menu.
- Click the edit button (pencil icon) on the Navigation Drawer Menu (Link List Gadget).
- A Link List Configuration Popup will appear.
- You can skip the Title and Number of items to show in list input or leave it blank.
- In the Sorting section, you can choose between Don't sort, Sort Alphabetically or Sort Reverse Alphabetically. Please choose according to your wishes (Optional).
- To add a new menu item, click the ADD A NEW ITEM button. Here are a few things that can be set:
- In the Site name input, enter a menu name.
- In the Site URL input, enter the menu URL.
- If both inputs are set, click the SAVE button next to them.
- If you want to finish the configuration, click the SAVE button at the bottom.
You can also add custom text with the available CSS Utilities. The custom text can be in the form of information that the menu is important or just a decoration. You just need to add the following code beside the item name. Example:
<span>Menu Name</span><span class="text-xs text-colorDrawerMenuItemSelected ltr:ml-2 rtl:mr-2 dark:text-colorDarkKey">Baru</span>Adding Icons to Menu Items
To make the menu items in the Navigation Drawer Menu more attractive, you can add icons to it. You can choose to use the Matericons or the Material Design Icon Picker.
Adding Icons using Matericons
Matericons is an open source and optimized collection of SVG Icons from Materia X2. Here are some steps to use it:
- Go to the Matericons page.
- In the search bar, find and select the name of the icon you want to use.
- A popup will appear. Copy all the SVG Markup code in the Code Box by clicking the Copy icon.
Next, you can follow the following steps:
- Go to Blogger Dashboard and select the Layout menu.
- Look for the section titled Navigation Drawer and More Menu.
- Click the edit button (pencil icon) on the Navigation Drawer Menu (Link List Gadget).
- A Link List Configuration Popup will appear.
- You can edit an existing Menu Item by clicking the Edit button (Pencil Icon) or create a new menu item by clicking the ADD A NEW ITEM button. Here are some steps to set it up:
- In the Site name input, paste the SVG that you copied earlier followed by the menu name. Example:
<svg>...</svg> Menu Name - In the Site URL input, enter the menu URL.
- If both inputs are set, click the SAVE button next to them.
- If you want to finish the configuration, click the SAVE button at the bottom.
aria-hidden="true" attribute to the svg tag. Example: <svg aria-hidden="true">...</svg> Menu Name.Adding Icons using Material Design Icon Picker
Material Design Icons Picker is a Browser Addon that is useful for finding and using Material Design-themed SVG Icons that have thousands of icons.
Before that, you need to use the SVG icon library called Material Design Icons Picker available for Google Chrome or Mozilla Firefox.
After the addon is installed on the browser you are using, then you can follow these steps:
- Click the Material Design Icons Picker Addon.
- In the search bar, find the name of the icon you want to use.
- Select the icon. At the bottom, click the Copy..., and choose Copy SVG.
Next, you can follow the following steps:
- Go to Blogger Dashboard and select the Layout menu.
- Look for the section titled Navigation Drawer and More Menu.
- Click the edit button (pencil icon) on the Navigation Drawer Menu (Link List Gadget).
- A Link List Configuration Popup will appear.
- You can edit an existing Menu Item by clicking the Edit button (Pencil Icon) or create a new menu item by clicking the ADD A NEW ITEM button. Here are some steps to set it up:
- In the Site name input, paste the SVG that you copied earlier followed by the menu name. Example:
<svg>...</svg> Menu Name - In the Site URL input, enter the menu URL.
- If both inputs are set, click the SAVE button next to them.
- If you want to finish the configuration, click the SAVE button at the bottom.
- You can also add svg icons apart from using the Material Design Icons Picker Plugin or Matericons. However, please note that the icon must be 1:1 in size and have only one path data.
- By default, the size of the SVG icon is 1:1 (24px x 24px).
- To avoid accessibility warnings, make sure you add the
aria-hidden="true"attribute to the svg tag. Example:<svg aria-hidden="true">...</svg> Menu Name.
Adding Delimiters to Menu Items
This setting is useful for adding a dividing line or delimiters between menu items in the Navigation Drawer Menu. To set it up, follow these steps:
- Go to Blogger Dashboard and select the Layout menu.
- Look for the section titled Theme Panel Top.
- Click the edit button (pencil icon) on the CSS Options (Link List Gadget).
- A Link List Configuration Popup will appear.
- You can skip the Title and Number of items to show in list input or leave it blank.
- In the Sorting section, you can choose between Don't sort, Sort Alphabetically or Sort Reverse Alphabetically. Please choose according to your wishes (Optional).
- Click the ADD A NEW ITEM button.
- Here are a few things that can be set:
- In the Site name input, type
menuBorderormenuDivider. - In the Site URL input, enter the order of the menu items you want to delimit. Example:
3(There will be a border on the menu item number 3). - If both inputs are set, click the SAVE button next to them.
- In the Site name input, type
- If you want to add menu items in another order, please repeat steps 8.
- If you want to finish the configuration, click the SAVE button at the bottom.
Adding Notification Badge to Menu Items
This setting is useful for adding a notification badge or dots to the menu items in the Navigation Drawer Menu. To set it up, follow these steps:
- Go to Blogger Dashboard and select the Layout menu.
- Look for the section titled Theme Panel Top.
- Click the edit button (pencil icon) on the CSS Options (Link List Gadget).
- A Link List Configuration Popup will appear.
- You can skip the Title and Number of items to show in list input or leave it blank.
- In the Sorting section, you can choose between Don't sort, Sort Alphabetically or Sort Reverse Alphabetically. Please choose according to your wishes (Optional).
- Click the ADD A NEW ITEM button.
- Here are a few things that can be set:
- In the Site name input, type
menuBadgeormenuNotificationormenuDots. - In the Site URL input, enter the order of the menu items you want to add the badge. Example:
3(There will be added a badge on the menu item number 3). - If both inputs are set, click the SAVE button next to them.
- In the Site name input, type
- If you want to add menu items in another order, please repeat steps 8.
- If you want to finish the configuration, click the SAVE button at the bottom.
- This feature is only useful if you are using Materia X2 version 2.9 and above.
- Make sure you DO NOT add any new items into CSS Options Gadget other than those in the documentation.
Adding Sub-Menu to Navigation Drawer Menu
Navigation Drawer Menu can also have Sub-Menu up to level 2. The Sub-Menu will automatically have an arrow directional icon that is useful as a marker that there is a sub menu or a sign that the sub-menu is being opened or closed.
Customizer Settings
There are several Options and Color settings for all elements in the Navigation Drawer Menu.
Options for Navigation Drawer Menu
There are several settings that can be customized, namely:
Navigation Drawer State on Desktop
This setting is useful for setting the state or position of the Navigation Drawer Menu when the menu button in the header is clicked. Here is an explanation as well as some steps to customize it:
- Go to Blogger Dashboard and select the Theme menu.
- Click the CUSTOMIZE button.
- Click Advanced Dropdown, click Default Options Dropdown and Select Navigation Drawer Options.
- Look for the Slider setting named Navigation Drawer Menu State on Desktop (Modal | Dismissable), drag the slider right or left. Here is the explanation:
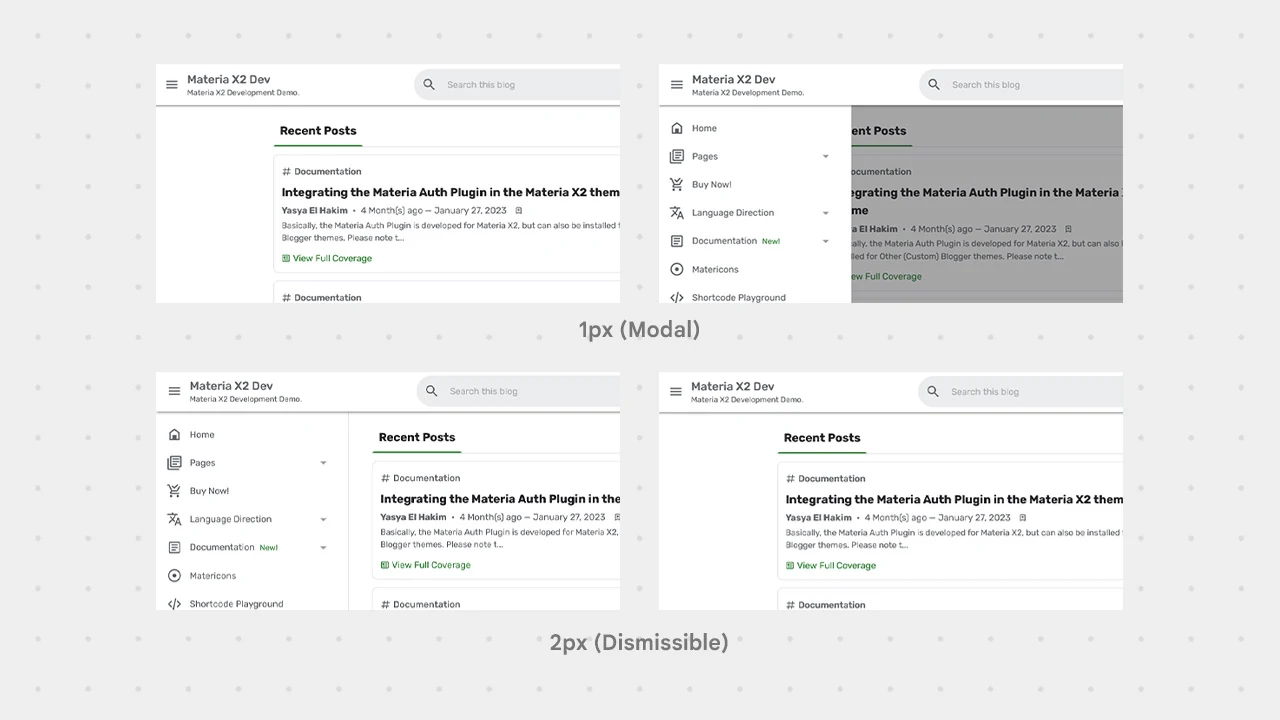
- 1px: Modal - Navigation Drawer Menu will be in front of main content (As in mobile view).
- 2px: Dismissable - Navigation Drawer Menu will shift main content.
- Click the Save button (diskette icon) in the lower right corner.
- Especially on the Error page and mobile screen, the Navigation Drawer Menu will be Modal and cannot be changed.
- If you set the Navigation Drawer Menu State on Desktop to 1px (Modal), a Backdrop will automatically appear which when clicked closes the Drawer Menu.
Navigation Drawer Edge Style on Desktop
This setting is useful for setting the edge style on the Navigation Drawer Menu especially on the Desktop screen. Here's an explanation and some steps to customize it:
- Go to Blogger Dashboard and select the Theme menu.
- Click the CUSTOMIZE button.
- Click Advanced Dropdown, click Default Options Dropdown and Select Navigation Drawer Options.
- Look for the Slider setting named Navigation Drawer Edge Style on Desktop (None | Border | Shadow), drag the slider right or left. Here is the explanation:

- 1px: None - Navigation Drawer without any edge styles.
- 2px: Border - Navigation Drawer with border.
- 3px: Shadow - Navigation Drawer with shadow.
- Click the Save button (diskette icon) in the lower right corner.
- If you set the Navigation Drawer Edge Style on Desktop to 2px (Border), then you can also set the color of the border. You can set it in the Color Settings for Navigation Drawer Menu section below.
- If you set the Navigation Drawer Edge Style on Desktop to 3px (Shadow), then you can also set the color of the shadow. You can set it in the Color Settings for Navigation Drawer Menu section below. Apart from that, you can also set the Navigation Drawer Edge Shadow Thickness.
Navigation Drawer Edge Style on Mobile
This setting is useful for setting the edge style on the Navigation Drawer Menu especially on the Mobile screen. Here's an explanation and some steps to customize it:
- Go to Blogger Dashboard and select the Theme menu.
- Click the CUSTOMIZE button.
- Click Advanced Dropdown, click Default Options Dropdown and Select Navigation Drawer Options.
- Look for the Slider setting named Navigation Drawer Edge Style on Mobile (None | Border | Shadow), drag the slider right or left. Here is the explanation:
- 1px: None - Navigation Drawer without any edge styles.
- 2px: Border - Navigation Drawer with border.
- 3px: Shadow - Navigation Drawer with shadow.
- Click the Save button (diskette icon) in the lower right corner.
- If you set the Navigation Drawer Edge Style on Mobile to 2px (Border), then you can also set the color of the border. You can set it in the Color Settings for Navigation Drawer Menu section below.
- If you set the Navigation Drawer Edge Style on Mobile to 3px (Shadow), then you can also set the color of the shadow. You can set it in the Color Settings for Navigation Drawer Menu section below. Apart from that, you can also set the Navigation Drawer Edge Shadow Thickness.
Navigation Drawer Edge Shadow Thickness
This setting is useful for adjusting the thickness of the Shadow on the Navigation Drawer Menu. Shadow thickness is measured in dp units.
Note that this setting is only useful if you have set the Navigation Drawer Edge Style on Desktop and Navigation Drawer Edge Style on Mobile to 3px (Shadow).
There are three options that you can choose from, including 2dp (Thin), 4dp (Medium) and 6dp (Thick). Here are some steps to customize and some explanations:
- Go to Blogger Dashboard and select the Theme menu.
- Click the CUSTOMIZE button.
- Click Advanced Dropdown, click Default Options and Select Navigation Drawer Options.
- Look for the Option named Navigation Drawer Edge Shadow Thickness (Thin | Medium | Thick), drag the slider right or left. Here is the explanation:

- 1px: Thin - Navigation Drawer with Shadow Thickness 2dp (Thin).
- 2px: Medium - Navigation Drawer with Shadow Thickness 4dp (Medium).
- 3px: Thick - Navigation Drawer with Shadow Thickness 6dp (Thick).
- Click the Save button (diskette icon) in the lower right corner.
Navigation Drawer Menu Item Auto-Attributes
This setting is useful to set the target and rel attributes in the Navigation Drawer Menu Item automatically.
If the link in Navigation Drawer Menu Item the item is an external link, it will automatically add the attribute target="_blank" (Open a new tab) and the attribute rel="nofollow noopener noreferrer".
Here are some steps to customize and some explanations:
- Go to Blogger Dashboard and select the Theme menu.
- Click the CUSTOMIZE button.
- Click Advanced Dropdown, click Default Options and Select Navigation Drawer Options.
- Look for the Option named Navigation Drawer Menu Item Auto-Attributes (Disable | Enable), drag the slider right or left. Here is the explanation:
- 1px: Disable - To disable this feature.
- 2px: Enable - To enable this feature.
- Click the Save button (diskette icon) in the lower right corner.
- This feature is only available on Materia X2 version 3.4 and above.
- Make sure when writing the Site URL, always end it with a Slash "
/". Example:https://www.elcreativeacademy.com/. Otherwise, all links will open in New Tabs.
Navigation Drawer Item Corner Radius
This setting is useful for setting the rounded corner radius for the Navigation Drawer Menu Items. Here are some steps to customize and some explanations:
- Go to Blogger Dashboard and select the Theme menu.
- Click the CUSTOMIZE button.
- Click Advanced Dropdown, click Default Options Dropdown and Select Navigation Drawer Options.
- Look for the Option named Navigation Drawer Item Corner Radius, drag the slider right or left until you find the corner radius you want.

- Click the Save button (diskette icon) in the lower right corner.
Color Settings for Navigation Drawer Menu
There are several color settings for the Navigation Drawer Menu that can be customized, namely:
- Navigation Drawer Edge Border Color - To set the Edge Border color on the Navigation Drawer Menu.
- Navigation Drawer Edge Shadow Color - To set the Edge Shadow color on the Navigation Drawer Menu.
- Navigation Drawer Background Color - To set the Background color on the Navigation Drawer Menu.
- Navigation Drawer Item Color - To set the Menu Item color including Icons on the Navigation Drawer Menu.
- Navigation Drawer Item Selected Color - To set the Selected Menu Item color including Icons and Vertical Line (Selected Menu Indicator) on the Navigation Drawer Menu.
- Navigation Drawer Delimiter Color - To set the Delimiter color on the Navigation Drawer Menu.
- The Navigation Drawer Edge Border Color setting is only useful if you have set the Navigation Drawer Edge Style on Desktop and Navigation Drawer Edge Style on Mobile to 2px (Border).
- The Navigation Drawer Edge Shadow Color setting is only useful if you have set the Navigation Drawer Edge Style on Desktop and Navigation Drawer Edge Style on Mobile to 3px (Shadow).
- The Navigation Drawer Delimiter Color setting is only useful if you have set the Navigation Drawer Menu Item Delimiter.
Here are some steps to customize it:
- Go to Blogger Dashboard and select the Theme menu.
- Click the CUSTOMIZE button.
- Click Advanced Dropdown, click Default Options Dropdown and Select Navigation Drawer Options.
- Find a color setting and select the color you want to change.
- Click the Save button (diskette icon) in the lower right corner.
Those are some steps to configure the Navigation Drawer Menu in Materia X2 Theme. If you have any questions, please write them in the comments section.
If you want to report some bugs, you can write them in the comments section on the Bug Report page and if you want to request new features or want to provide feedback, please write them in the comments section on the Request and Feedback page.
[image] image_url [/image]
To add a code block:
[code] your_code [/code]
To add a quote:
[quote] your_quote [/quote]
To add a link:
[link] your_link_text | link_url [/link]