
Configuring Custom Icons and Icon Packs in Materia X2 Theme

Materia X2 uses SVG icons with a Material Design theme. There are several advantages of Icon SVG, including scalability, SEO friendly, editing ability, and independent resolution. Therefore, the future of SVG will look bright and the trend of using SVG will continue to increase.
Table of Contents
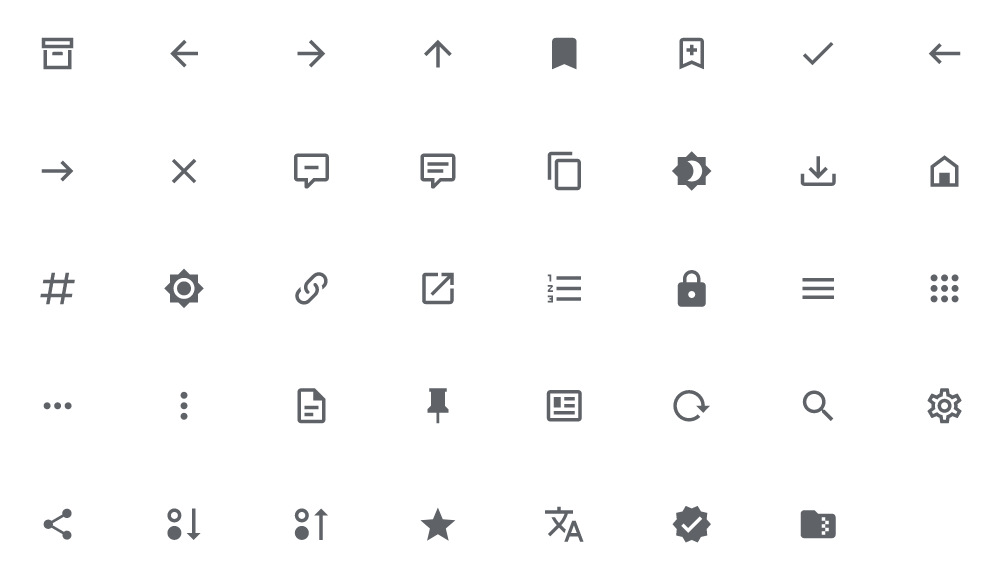
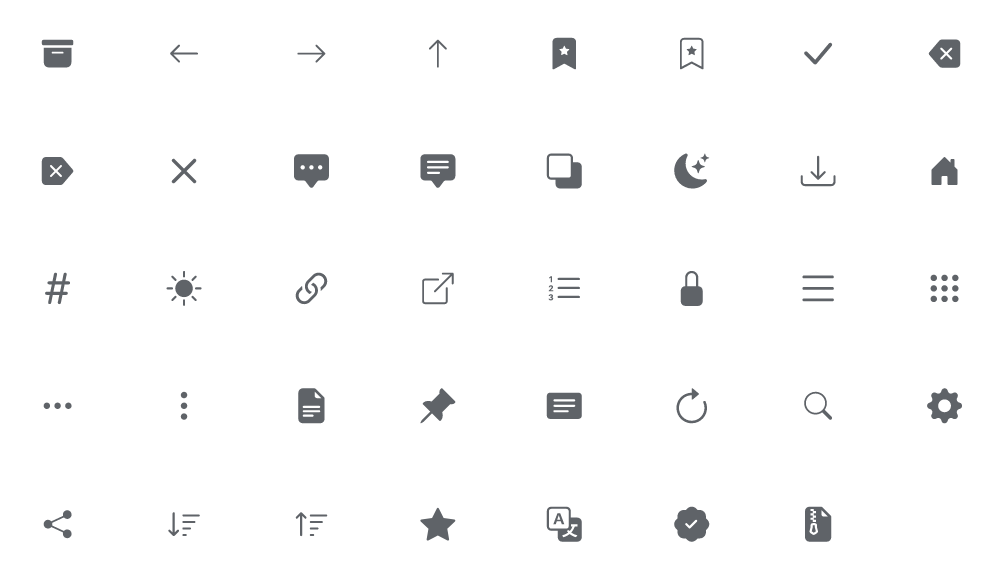
Default Icon Set
There are several Icon Sets from Materia X2. Here are each of them and their explanation:
| Preview | Icon ID |
|---|---|
| icon_archive | |
| icon_arrow_left | |
| icon_arrow_right | |
| icon_arrow_top | |
| icon_bookmark | |
| icon_bookmark_add | |
| icon_check | |
| icon_clear | |
| icon_clear_rtl | |
| icon_close | |
| icon_comment | |
| icon_comment_text | |
| icon_copy | |
| icon_dark | |
| icon_download | |
| icon_home | |
| icon_label | |
| icon_light | |
| icon_link | |
| icon_link_open | |
| icon_list | |
| icon_lock | |
| icon_menu | |
| icon_menu_more | |
| icon_more | |
| icon_more_vertical | |
| icon_page | |
| icon_pin | |
| icon_read_more | |
| icon_reload | |
| icon_search | |
| icon_settings | |
| icon_share | |
| icon_sort_ascending | |
| icon_sort_descending | |
| icon_star | |
| icon_translate | |
| icon_verified | |
| icon_zip |
Default Logo Icon Set
| Preview | Icon ID |
|---|---|
| icon_android | |
| icon_blogger | |
| icon_email | |
| icon_facebook | |
| icon_linkedin | |
| icon_pinterest | |
| icon_reddit | |
| icon_skype | |
| icon_telegram | |
| icon_twitter | |
| icon_whatsapp | |
| icon_youtube |
Changing the Default Icon Set (Individual)
You can change the default icon set easily. Materia X2 also has Pre-Defined Default Custom Icons. If you want to change the Default Icon Set, then you need to change them one by one. Follow these steps:
- Go to Blogger Dashboard, select the Theme menu.
- Click the CUSTOMIZE button.
- Click Advanced Dropdown, click Default Options Dropdown.
-
Look for the Slider setting named Custom SVG Icon (Disable | Enable), drag the slider right or left. Here is the explanation:
- 1px: Disable - Custom SVG Icons will be disabled.
- 2px: Enable - Custom SVG Icons will be enabled.
- Click the Save button (diskette icon) in the lower right corner.
Next, you can set Icon one by one. Follow these steps:
Adding Icon Set using Matericons
Matericons is an open source and optimized collection of SVG Icons from Materia X2. Here are some steps to use it:
- Go to the Matericons page.
- In the search bar, find and select the name of the icon you want to use.
- A popup will appear. Copy all the SVG Path Data code in the Code Box by clicking the Copy icon.
Next, you can follow the following steps:
- Go to Blogger Dashboard, select the Layout menu.
- Look for the section titled Theme Panel Top.
- Click the edit button (pencil icon) on the Custom SVG Icons (Link List Gadget).
- A Link List Configuration Popup will appear.
-
You can edit an existing Menu Item by clicking the Edit button (Pencil Icon) or create a new menu item by clicking the ADD A NEW ITEM button. Here are some steps to set it up:
-
In the Site name input, enter the Icon ID. Example:
icon_archive.You can see and find out the Icon ID through the Default Icon Set table above.
- In the Site URL input, paste the SVG Path that was copied earlier.
- If both inputs are set, click the SAVE button next to them.
-
In the Site name input, enter the Icon ID. Example:
- If you want to finish the configuration, click the SAVE button at the bottom.
Adding Icon Set using Material Design Icon Picker
Material Design Icons Picker is a Browser Addon that is useful for finding and using Material Design-themed SVG Icons that have thousands of icons.
Before that, you need to use the SVG icon library called Material Design Icons Picker available for Google Chrome or Mozilla Firefox.
After the addon is installed on the browser you are using, then you can follow these steps:
- Click the Material Design Icons Picker Addon.
- In the search bar, find the name of the icon you want to use.
- Select the icon. At the bottom, click the Copy..., and choose Copy SVG Path.
Next, you can follow the following steps:
- Go to Blogger Dashboard, select the Layout menu.
- Look for the section titled Theme Panel Top.
- Click the edit button (pencil icon) on the Custom SVG Icons (Link List Gadget).
- A Link List Configuration Popup will appear.
- You can edit an existing Menu Item by clicking the Edit button (Pencil Icon) or create a new menu item by clicking the ADD A NEW ITEM button. Here are some steps to set it up:
-
In the Site name input, enter the Icon ID. Example:
icon_archive.You can see and find out the Icon ID through the Default Icon Set table above.
- Click the Material Design Icons Picker Addon that you have installed before.
- In the search bar, find the name of the icon you want to use or the icon corresponding to the label you selected.
- Select the icon. At the bottom, click the Copy... > Copy SVG Path.
- Back to Link List Configuration. In the Site URL input, paste the SVG Path that was copied earlier.
- If both inputs are set, click the SAVE button next to them.
- If you want to finish the configuration, click the SAVE button at the bottom.
You can also use SVG Icons in addition to Material Design Icons. But make sure that the icon only has Single Path Data with a maximum width and height of 24px and a viewBox 0 0 24 24.
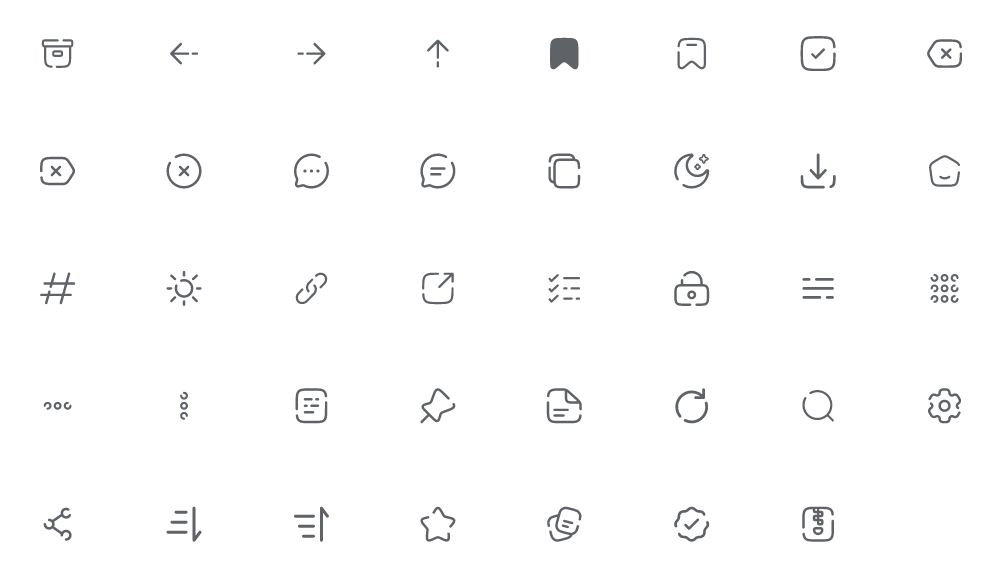
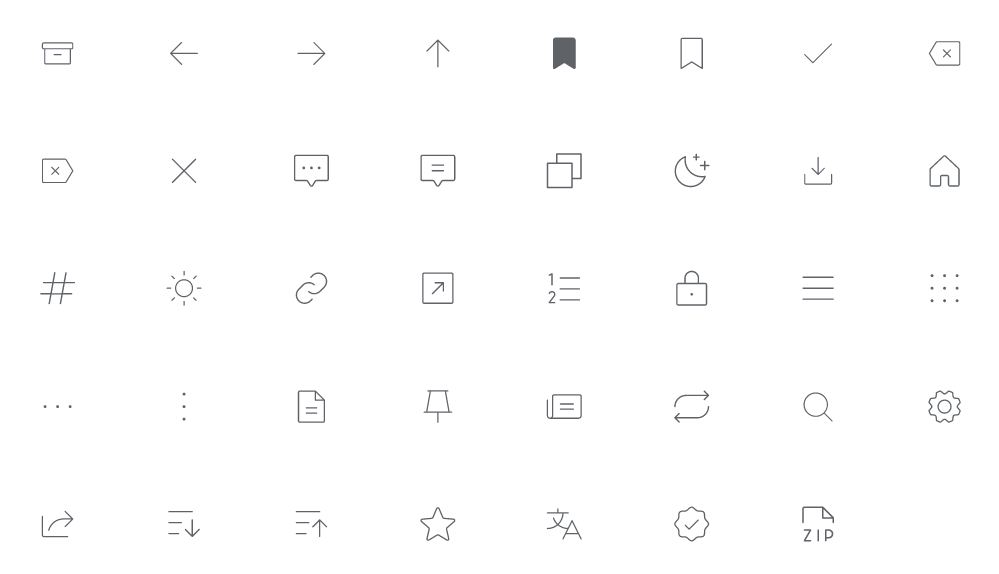
Changing the Default Icon with Icon Pack (SVG Sprite)
In addition to changing the Default Icon Manually as described above, you can also use the Icon Pack that we have provided.
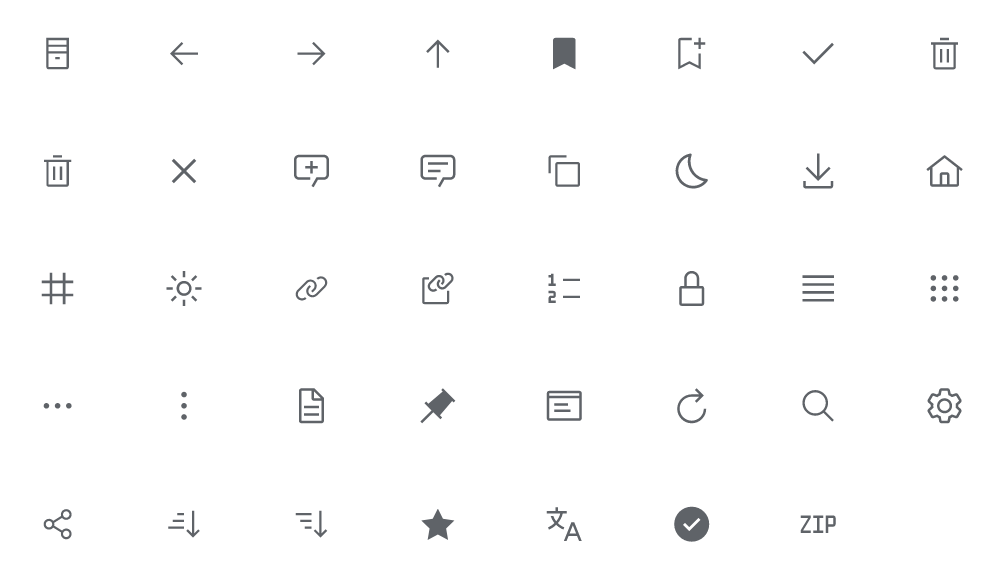
There are several Default Icon Packs that we provide, here is how it looks:
Icon Pack #1 (Default)
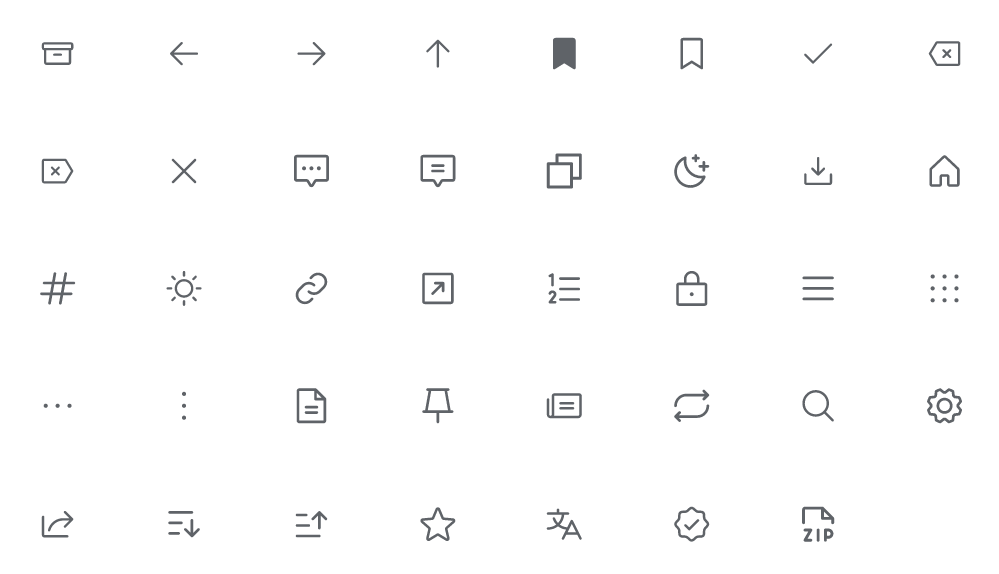
Icon Pack #2
Icon Pack #3
Icon Pack #4
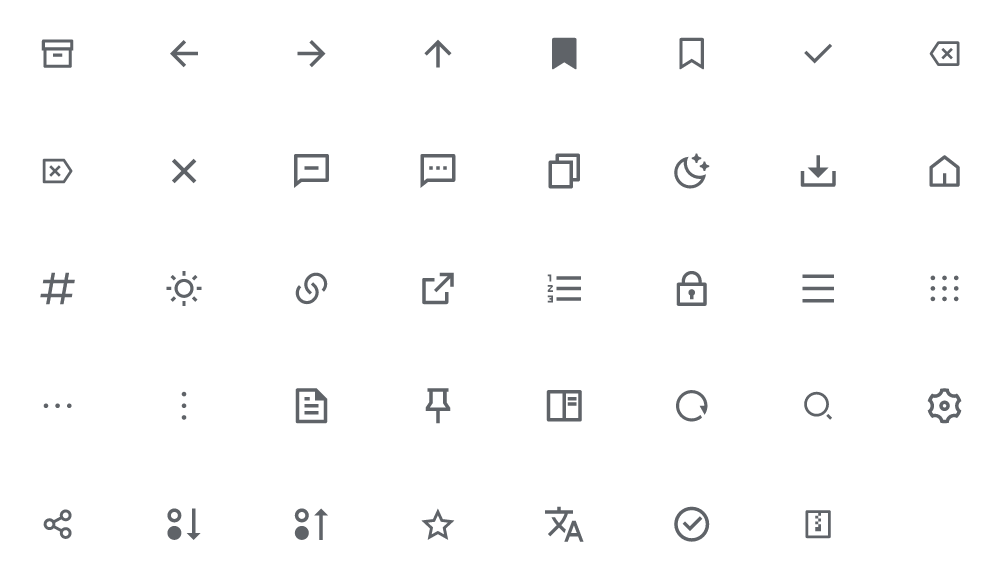
Icon Pack #5
Icon Pack #6

Icon Pack #7

Icon Pack #8
Icon Pack #9

Icon Pack #10

Icon Pack #11

Icon Pack #12

Icon Pack #13
To set it up, follow these steps:
- Go to Blogger Dashboard, select the Theme menu.
- Click the CUSTOMIZE button.
- Click Advanced Dropdown, click Default Options Dropdown.
-
Look for the Slider setting named Custom SVG Icon (Disable | Enable), drag the slider right or left. Here is the explanation:
- 1px: Disable - Custom SVG Icons will be disabled.
- 2px: Enable - Custom SVG Icons will be enabled.
- Click the Save button (diskette icon) in the lower right corner.
Next, you need to enter the Icon Pack code. Follow these steps:
- Copy one of the SVG Sprite codes above by clicking the copy button provided.
- Go to Blogger Dashboard, select the Layout menu.
- Look for the section titled Theme Panel Top.
- Click the edit button (pencil icon) on the Custom SVG Icon Pack (SVG Sprites) (HTML/JavaScript Gadget).
- A HTML/JavaScript Configuration Popup will appear.
- You can leave the Title input blank.
-
Here are some steps to set it up:
- On Content input/textarea, Paste the code that you copied earlier by pressing CTRL + V on the keyboard.
- If you want to finish the configuration, click the SAVE button at the bottom.
- Please don't add any code to the Custom SVG Icon Pack widget other than what is in the documentation.
- If you are using a Custom SVG Pack (SVG Sprites), then don't add the Default Icon Sets into the Custom SVG Icons gadget. If you add it, it will become a duplicate and maybe the Custom SVG Pack (SVG Sprites) won't work.
Those are some steps to configure the Icons in Materia X2 Theme. If you have any questions, please write them in the comments section.
If you want to report some bugs, you can write them in the comments section on the Bug Report page and if you want to request new features or want to provide feedback, please write them in the comments section on the Request and Feedback page.
[image] image_url [/image]
To add a code block:
[code] your_code [/code]
To add a quote:
[quote] your_quote [/quote]
To add a link:
[link] your_link_text | link_url [/link]
You can also read https://www.akutawhuku.my.id